vCenter Orchestrator: Operation Automate - Part Two
So another day, another piece of the workflow! Today we will be generating input parameters, and workflow attributes. There are a few ways to do this but I will step through each piece so we can generate the parameters and attributes semi-automatically. Each piece of the workflow will require some type of code and therefore will require some parameters and attributes to know what to work with.
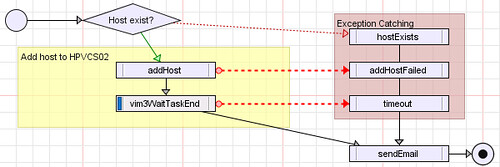
Before doing this, let’s link all of the pieces so we can see the actual flow of the workflow. To do this you can hold the Ctrl key while you left-click the task or select the Connector Tool from within the Schema editor. I typically use the Ctrl-click method, it just seems faster to me. We will want to connect the Start Workflow to the Decision task (Host exists?). This tells vCO that when we start the workflow to look at the decision piece first. Next we want to connect the Host exists? task to the addHost task. This will tell vCO that when the decision is made that the host doesn’t exist to go ahead and go on to the addition of the host to vCenter. After linking these you will want to link the addHost task to the vim3WaitTaskEnd task that we created. This will let vCO know that we need to wait until this task has completed in order to move on through the workflow. Now, connect the vim3WaitTaskEnd task to the sendEmail task. This lets vCO know that once the task is completed, send an email notification of completion. Finally, link the _sendEmail task _to the _End Workflow_piece. Your workflow schema should look something like this:
 ]
]
As we can see here we have a very basic outline of the workflow now. Currently it doesn’t do anything as we have not really configured anything. At this point we need to add some error and exception catching tasks to the workflow so we can send email notifications with that failure information. To do this, drag and drop three (3) more scriptable task buttons onto the grid. We will want to name them as follows and link them like so:
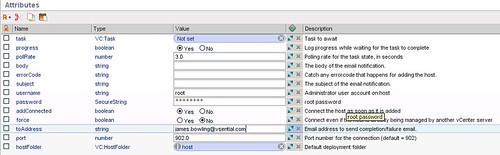
Now that we have all the required pieces out there, let’s move on to putting in some actual information to make these tasks do something. In this portion we will create the input attributes. I will not go into too much detail but in order to create attributes you will select the General tab at the top of the vCO client. From here you will be presented with the general information at the top and the bottom is where the attributes live. To create an attribute you can click on the “A+” icon. This will create a new attribute for you with a default name of att0. You can click on the attribute name to change it and also click on the type in order to select a type for the attribute. If you have specific questions about this then please post a comment. Otherwise, create the following attributes:
Now that we have the workflow attributes set we can move on to the workflow inputs. Now one might ask, “What is the difference between a workflow attribute and a workflow input?“ Simply stated, attributes can be looked at as constants and can be set for all executions of the workflow. Workflow inputs are exactly that, they are requested input from the user running the workflows. These are used to create the presentation for what the users see when running the workflow, which we will get into later on.
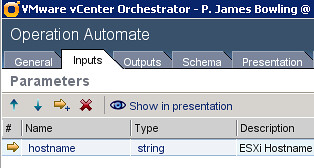
To create a workflow input, you need to select the Inputs tab at the top of your vCO client. To add an new input parameter you will click on the icon that looks like an arrow with a plus sign next to it. Creating an input parameter is much like creating an attribute. In this particular case since one of the requirements is minimal input requirement from an end-user we will only need a single input parameter called hostname. It should be of Type:string and have a description attached to it something like, “ESXi Hostname”. It should look like this:
Now that we have created the workflow attributes and input parameters we are ready to move on to the actual configuration of the tasks created earlier. Since I am such a mean spirited person, I am going to post that piece as a separate section…stay tuned for the new post in the Operation Automate series.